Monday, November 30, 2009

Christmas Tree Wreath Frame Topper


This is a simple craft that anyone can do. Anyone.

First, you'll need materials.
  • wreath form
  • foam sheet in color of your choosing
  • paper in color of your choosing
  • wire - or maybe wire coat hanger?
  • moss (I used Spanish moss)
  • glue/glue dots
I picked up my wreath form at the Dollar Tree. It's an oval shape that is about 9.5" tall.


Then I got my wire out. You'll want to use something that can bend pretty easy but not too easy. This is a pretty large gauge but it worked really well. It's a left over piece so I couldn't tell you how big it actually is. It's bigger around than a wire hanger. It is aluminum though so it bends easily.


*Notice that I went into the wreath and out sideways with the wire - not over the bottom of the wreath.

You'll want to put your wire through the wreath. Pull the ends of the wire so they are even and then twist the wires together at the bottom underside of the wreath. Make the twist tight and secure so that the topper doesn't wobble around.  Then I just used my hands to bend the wire into an enlarging cone shape.
(I like the aluminum wire because it was flexible enough to easily bend to accommodate our tree top.)


Put a piece of foam under the wreath form and trace the center opening of the form. Now cut it out and make sure it fits. Trim it up if necessary. The goal is to make it fit snug but not too snug. I didn't use glue. The fit holds it in place fine. Glue is always a possibility if you can't get it to stay, though.


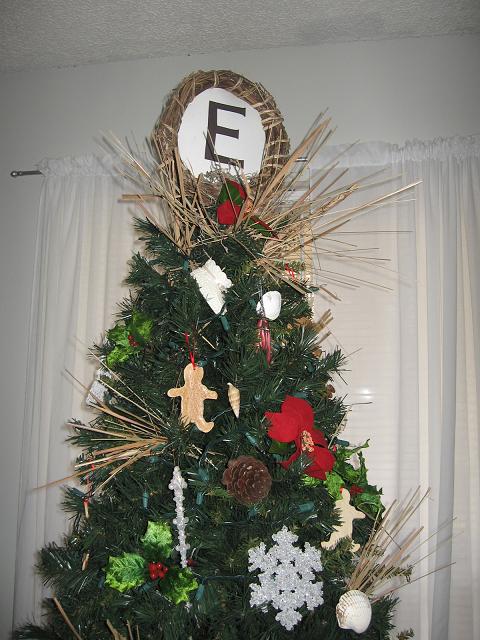
Now figure out what you want on it. I used an initial and a cross. Cut your shapes out of any color paper and use some glue dots to hold them in place.


If you don't like the look of the sides, glue some Spanish moss to the sides of the foam.

The sides were fine, to me. I just used moss to cover the silver wire at the bottom.


Voila! 
You have your own nest inspired tree topper frame thingy.


You can really expand on this by using scrapbooking paper to cover the foam or scrap paper for the shapes. You might want to add ribbon, bells ,or a bird.

BTW... if you feel at home here, please consider following. The button is on the side. :)

 Happy Crafting!


DIY Day @ ASPTL

It's beginning to look a lot like Christmas. - updated

Yeppers, it is beginning to look a lot like Christmas, emphasis on the beginning part.
I still have a laundry list of things to do. It seems I'm forever in the midst of several projects, but I'm off to a good start. I'll have my little elves... um kids... making a few ornaments soon.
Here are a few pics.
Minimalism is what I lean toward but I like my Christmas tree loaded down. Right now it's a bit sparse but we'll be adding twig frames with silhouettes, nests and some other ornaments.

This year I wanted a natural look. (This picture got updated. See, the pampas fronds I added?)

We used raffia, seashells, pine cones, snowflakes, holly, salt dough gingerbread men, poinsettias, crochet stockings, and a mixture of a couple misc. ornaments.
(I added the pampas fronds and I love the feathery look they give it. It's also another natural beachy element.)

For the topper, I picked up a small oval wreath form and added an oval of white foam. On one side I added an "E" and on the other I added a cross.
Tutorial Here


Ahhh. The tree sitting by our electric fire is as good as a real fire to me. No cleaning, ashes, and kids getting messy. LOL.

On the mantle we have a shutter for displaying cards and pictures, the other frugal Friday gifts - one filled with candy canes and a starfish, my hurricane with shells and two evergreen branches... er... everplastic?, and my pheasant from Goodwill. Oh how I love Goodwill. Let me count the ways.

Since this picture, I've added homemade stockings for our three little ones. I also added homemade stocking hangers but I need to paint them...
The stocking are a rip off of some stockings I spotted around blogland and the stocking hangers are a rip off of the out of stock ones at Lands End. They hold weight exceptionally well and aren't deadly if pulled off by a toddler.
Go here if you want to see the stockings being made.
The hanger tutorial is coming tomorrow night.
Our kitchen table is pretty sparse. I have some candlesticks I could add but we do homeschool on here so I like to leave it pretty bare.
That's a new silver tone platter that I picked up for a buck. I liked it enough that glued it down. Now that's commitment! I won't glue things together unless I really like them that way. Even then I usually second guess it.
You may remember this cloche that I picked up at Goodwill. Okay, so it's most likely the dome of clock but I still think it was a great find. I may glue on a knob to the top for a handle. ;) It's sitting on the coffee table and my two year old won't leave it be. I plan on finding it a new base if it makes it.
Looking into our small galley kitchen you see this. I still need to frame the gray square on the wall. It's where we now intend to display the kids' homeschool stuff. Look past the counters, I loath them. I want new ones soOOoo bad.
Looking out of the kitchen...
(It's a bit sparse on the back side but I'll fix that soon enough. I also plan to seek out some very tiny starfish to add in here.)
Ah yes... and our frugal gift... wound up in my kitchen. LOL!
Finally, pics of the updated door bucket that also got pampas fronds.


I hope you enjoyed the tour.

Happy Holidays All!


Christmas Tour of Homes with The Nester

Friday, November 27, 2009

Fabulous, Fantastic, and Frugal Friday - Gift No. 4 - Menu Board

How many of us plan a menu for the week, shop for the menu, and then forget what we were planning to cook by the time Wednesday rolls around?

I'm guilty of that but those big chalkboards have no place in most smaller kitchens. When I spied an idea that offered a solution I was determined to have my version of it.

Confession: I totally ripped the idea off from Southern Living at Home.

If you want to see the real deal go here:
http://mag1.olivesoftware.com/ActiveMagazine/welcome/STLM/SouthernLivingatHome.asp
Look on page 17.

The one we'll be making looks completely different but the idea is the same.


Supplies
  • black chalkboard paint
  • wood plaque or a board cut to size of your choosing
  • ribbon
  • plate stand
  • chalk
  • drill and drill bit that is large enough to make a hole to push ribbon through

First, grab your plaque/board. They are pretty inexpensive. I got mine for a dollar and some change.


Decide where you want the ribbon. I put the holes for my ribbon 2" from the side and 1.5" from the top. I marked it...

and drilled the holes so it would be perfectly even.


Make sure to sand the holes well, front and back.


Next, paint your plaque with chalkboard paint. I used black because it was under the sink and I'm way to lazy to get up and go to the store after all that turkey. ;) It does come in other colors, though.


Let it dry. Meanwhile, enjoy this homemade red velvet delight. MMMM!


Then grab your ribbons. Cut them the length of the space between the holes times three and allow for the tails on each end. Why you ask?
Because you need to lace the board like this...


You may want to cut a "v" shaped notch or slanted ends to make them pretty.


Little tip - If you take the flame of a lighter and run it across the cut ends it won't fray. Most ribbon is polyester so the heat melts and seals the threads.

Cut as many different ribbons as you like and include them in the gift bag. That's what I love about this gift! It's awesome for those who like to decorate for the seasons...


Now, grab that plate stand.
You can rock it out with a snazzy one like this...


or go a bit more frugal by picking up one at the one dollar store...


or give it some pop with a color like this...


Include some chalk, small or large...


and give it to someone absent minded, like me.
They'll appreciate it!

BTW, if you don't like chalk use a small dry erase board instead. If you want, hang it on the wall by adding hanging hardware.
How about some different ribbon for a teen's room?
Or... use magnetic paint and include a magnet. Then you have a place to keep your recipe card tidy while you cook.


Make it yours or theirs. ;)

Happy Gift Giving!

NNMHHKYS7AY6

NNMHHKYS7AY6
Technorati Profile

Tuesday, November 24, 2009

Some decor additions

Red velvet cake with cream cheese icing, turkey, dressing, homemade rolls, and glazed carrots are all waiting to get made while I indulge my decorating addiction.
I haven't put all my new purchases in place but these two cast-offs have found spots to call home, for now anyway.

So, where did this pheasant go?


ta-da...


Okay, you don't get credit for that one. My picture cropping gave that one away. lol.


I've been loving the feathers and natural decor this Christmas so I think me finding her was meant to be.

She looks good from any angle.
That shutter is for holding Christmas cards and photos that we get in the mail this time of year. I have extras that we'll spice up for a "Fabulous Friday" gift. ;)


Now, what about the homeless fish?


He has now found a new home here...


I hung him about four inches lower than the door frames in the room. He brings some color to the large gray area above the television and adds height.

Side note ~ My demonic camera seems to wash out color and depth. It's got a flash that could kill a vampire 40 miles away. It turned the screen on the T.V. a creepy white so I blocked it out in black. The wall color is really a light gray and the white background of the two side photos contrast more than what is visible in the photo.

Check back soon for my cheap and easy countdown for Christmas decorating and stay tuned for our Friday gift idea!
(I'm super excited about it!!!)


Related Posts with Thumbnails