 Ah, we've finally arrived. This is my 7th and last gift, the number seven representing completeness and perfection. How fitting that it is our 7th then, right?
This gift is a perfect fit for ladies that love to write, share, or read, ladies like some of you and myself.
First off...
Supplies
 Okay, all joking aside... back to our project...
Now cut out the circle and Mod Podge it to the washer. You can just smear it on with your finger or a paintbrush and stick the paper right on top. If you are doing a necklace use the smoother side of the washer for the back so it doesn't scratch. You can see the rougher side in this picture, the side the paintbrush is on - also the side you'll Mod Podge.

Let it dry for a few minutes and then trim the excess paper, around the edge, with scissors. Next, take a knife like this...
 and insert it with the tip down into the top middle part of your Mod Podged washer. It is super easy to run the knife around and cut a clean edge.
You'll then go over the entire top of the paper and edges, middle and outer, with Mod Podge. Let it dry completely and then do the same with this (squeeze some out on the top and edges)...
 You can find it at most scrapbooking stores. Stampers use it to raise their designs. It makes a plasticy thick layer with a glossy professional finish. If you've never used it before, you'll be in love after your first go 'round. Use it sparingly, it will spread a bit. After you go over it with that, you will have something that looks like this.
Notice that the smaller one is dry and you can see the colors well. The top one is still milky looking because it isn't dry. I used an old book that's pages were yellowing, love that - it's got history and wisdom that comes only with age. :)
 While that, or those, are drying, grab your jump rings and use your pliers to do this to them...
 Insert your bead in the gap and then close your pliers. Now your bead is on your jump ring. Mine were plastic but still pretty...
Be careful not to crack your beads.

If you use earrings, use some like this or another type that closes into a circle so that the washers and jump rings stay on.
 It may take a full day for your 3D lacquer to dry but when it is dry, slide the washer and jump ring onto the earring. It will look like this...
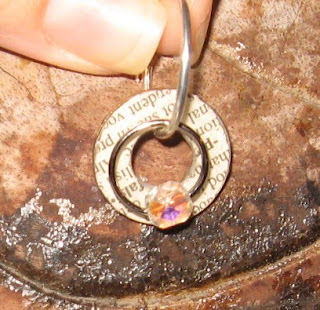 If you are using a necklace, slide the washer and jump ring with bead onto another jump ring. It will look the same as above but the earring would be the jump ring and you can then slide the ribbon/cord through the top jump ring. I wish I had a picture of the necklace but I only thought about making a necklace tonight, so it is still drying. I've had the earrings done.
Here is a pic of me sporting the earrings. I hate pictures of me, and especially ones of me with no make-up and feeling ick... thus the half shot.
 Now, credits for this idea...
I came up with the earrings first. I love my Staxx jewelry and the idea was from there. You can buy their pieces and put them on hoops. We have a boutique here that sales those and another jewelry brand. The other jewelry brand has lots of vintage images and writing. I wanted a combination so I came up with this but without the beads.
The necklace, sadly, didn't dawn on me until I was thinking about sharing pics of my birthday gift and link to the lady's site. My gift is from Queen Bee Designs by Amanda. On her page, she has something called "washers". Hers are sterling silver and nothing the same, but that got me thinking about a necklace to match. That then led to me thinking about the pretty crystal on my necklace and how I could easily add something similar to my frugal set. After quickly making three jump ring/bead sets. I had something that I consider exceptionally pretty. The only problem is that my necklace isn't dry because it got thought up today. I promise to add full pics of the set once the pendant is dry, Scouts honor.
I hope you are in love with this set as much as I am.
(picture added - sorry about the quality.)

Happy Friday! :)
First off...
Supplies
- book or page of type in small font
- washers (the kind you find in a hardware store or your toddler's mouth)
- Mod Podge
- 3D Crystal Lacquer
- jump rings
- beads
- Tools: scissors, pen or pencil, pliers, utility knife
- 1 pair of hoop earrings that completely close to a circle or ribbon/cord for a necklace
 Okay, all joking aside... back to our project...
Now cut out the circle and Mod Podge it to the washer. You can just smear it on with your finger or a paintbrush and stick the paper right on top. If you are doing a necklace use the smoother side of the washer for the back so it doesn't scratch. You can see the rougher side in this picture, the side the paintbrush is on - also the side you'll Mod Podge.

Let it dry for a few minutes and then trim the excess paper, around the edge, with scissors. Next, take a knife like this...
 and insert it with the tip down into the top middle part of your Mod Podged washer. It is super easy to run the knife around and cut a clean edge.
You'll then go over the entire top of the paper and edges, middle and outer, with Mod Podge. Let it dry completely and then do the same with this (squeeze some out on the top and edges)...
 You can find it at most scrapbooking stores. Stampers use it to raise their designs. It makes a plasticy thick layer with a glossy professional finish. If you've never used it before, you'll be in love after your first go 'round. Use it sparingly, it will spread a bit. After you go over it with that, you will have something that looks like this.
Notice that the smaller one is dry and you can see the colors well. The top one is still milky looking because it isn't dry. I used an old book that's pages were yellowing, love that - it's got history and wisdom that comes only with age. :)
 While that, or those, are drying, grab your jump rings and use your pliers to do this to them...
 Insert your bead in the gap and then close your pliers. Now your bead is on your jump ring. Mine were plastic but still pretty...
Be careful not to crack your beads.

If you use earrings, use some like this or another type that closes into a circle so that the washers and jump rings stay on.
 It may take a full day for your 3D lacquer to dry but when it is dry, slide the washer and jump ring onto the earring. It will look like this...
 If you are using a necklace, slide the washer and jump ring with bead onto another jump ring. It will look the same as above but the earring would be the jump ring and you can then slide the ribbon/cord through the top jump ring. I wish I had a picture of the necklace but I only thought about making a necklace tonight, so it is still drying. I've had the earrings done.
Here is a pic of me sporting the earrings. I hate pictures of me, and especially ones of me with no make-up and feeling ick... thus the half shot.
 Now, credits for this idea...
I came up with the earrings first. I love my Staxx jewelry and the idea was from there. You can buy their pieces and put them on hoops. We have a boutique here that sales those and another jewelry brand. The other jewelry brand has lots of vintage images and writing. I wanted a combination so I came up with this but without the beads.
The necklace, sadly, didn't dawn on me until I was thinking about sharing pics of my birthday gift and link to the lady's site. My gift is from Queen Bee Designs by Amanda. On her page, she has something called "washers". Hers are sterling silver and nothing the same, but that got me thinking about a necklace to match. That then led to me thinking about the pretty crystal on my necklace and how I could easily add something similar to my frugal set. After quickly making three jump ring/bead sets. I had something that I consider exceptionally pretty. The only problem is that my necklace isn't dry because it got thought up today. I promise to add full pics of the set once the pendant is dry, Scouts honor.
I hope you are in love with this set as much as I am.
(picture added - sorry about the quality.)

Happy Friday! :)


No comments:
Post a Comment