Saturday, October 31, 2009

Pillows - How to cheat and get away with it!

I had to make pillows for our new sofa last night. I'm still not completely finished. I need to make one more and some for the bed. Pillows are something I've made more times than I care to count but last night it dawned on me that I might have some knowledge to share. You see, I like to do things fairly cheaply and because of this I almost always us "fabric cheats". "Fabric cheats" are ways of using expensive fabric but backing with cheaper material. Many decorating shows will tell you that for a pillow you can cut two same size shapes and stitch them together. The problem is that when you walk by you are seeing this...

 The solution is very simple and only adds about 4" of the more expensive fabric.
First figure out how big you want your pillow to be. My pillow size is usually determined by what I find at... Goodwill!!! I buy pillows in good condition there. I take them home and put them directly in the washer on hot and then dry them in the dryer. That puts my cost between $2 and $4 for each pillow insert. Most inserts average $8 to $25 per insert, depending on size. Here is my Goodwill before pic of the pillow we are working on. It was actually in pretty good condition but it didn't match my living room. ;)
 
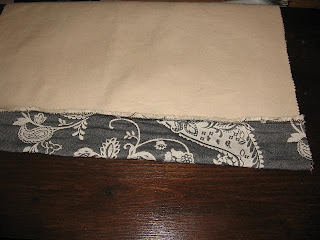
After you get the insert, you can make the pillow cover to fit. Just add 4" to the side that would be the front. Don't forget to add about a half inch for seams. Then make the backing 4" less. It should look like this if they are laying on top of each other. In this picture, I've already sewn one edge of the two fabrics together in this picture. I've flipped the side over so you can see.

You can sew the pillow completely and use the stuffing or leave the the bottom edge open. Just be sure to hem the edges and include a zipper, buttons, or ribbon to shut the opening.
Here is where the trick comes in. When you go to sew the sides of your pillow, sew the pillow so that a few inches of the front fabric will be bent over the top and bottom of the back of the pillow. Use about a 3" inch overhang at the top and a 1" overhang at the bottom.
 
The inside top corner will be where my finger is pointing in this picture below. Just start sewing the side seam there.

 The end product should look like this from the back. This picture is of the top but the bottom looks the same, just a little less overhang.

 It doesn't look like much of a change but the results speak for themselves. Here is the pillow we just made compared to one that has been made with the standard "fabric cheat". You can't even tell we cheated!

There are several ways to do this. Adapt this as you wish. The openings can be changed and moved to the middle of the backing fabric, etc. Next time I do a tutorial with this much detail, I'll upload a video. If you have any questions, just ask and
Happy Halloween!!!!

Thursday, October 29, 2009

Vinyl Door Numbers, Monograms, & Such


As promised, today I'll walk you through the steps to making your own vinyl door numbers and etc. Since I didn't think of taking pics while I actually cut out my door numbers, I have included pics from the plate I did last night. You see, I have some lovely monogrammed hand towels in my bathrooms and I wanted the lettering on the plate to match. To do that I had to draw the letter myself. You can use your trusty printer and a font you like. I've come to realize that less curvy fonts work better.

If you are one of those lucky Cricut owners, you can disregard this entire tutorial. Scroll down to the bottom to see read some gift giving ideas. :)

First you will need the letter, number, or shape/outline that you have printed or drawn out. You will also need a sheet of vinyl in the color of your choosing. These sheets can be purchased at craft or hobby stores. I got mine by the vinyl letters in Hobby Lobby for less than $2 a sheet and it only took one sheet to do the door and the plate. You will also need something to cut with. You can use scissors or a scrapbooking tool, like I have below. It's just a razor blade with a pen handle, more formally known as a light duty utility knife.


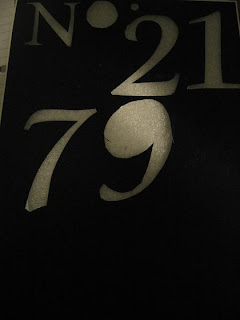
You can see the area where I cut my numbers out in this pic. The font for my door numbers was Cataneo BT. I set the font size for 368 for the numbers. The actual "NO." was done in New Times Roman font, font size 200. It will not display numbers that big in Microsoft or Open Office. All you have to do is click on the tab for font size and it will highlight then you can type in the size you want.


After that, lay your outlines on top of your vinyl sheet and start cutting. Keep your hand on the paper so the layers don's slip around and don't forget to put a mat underneath if you are using a utility knife. You definitely wouldn't want to have a furniture refinishing project lined up for you afterward!


Finally, pull the whole thing apart, keeping the backing attached until you are ready to place the lettering. After that, it's as simple as sticking a sticker on.


Here is where my "E" went. Sorry about the dark picture. My camera flashes so bright that it washes everything out so it was this or bright blur. :(


The possibilities are endless with what you could do. You could make a santa hat in red or stocking. You can put them in a frame, on a canister, on your tater bin, trash can, galvanized tin, christmas ornaments, or candlesticks. I can see a really cut gift of a clear antique canister monogrammed with vinyl lettering and filled with cookies for Christmas or a galvanized bucket with the outline of a mascot and filled with peanuts, beer and a sports cushion! If you fear you aren't crafty enough to do this project, I assure you you are but for bigger projects there is always the option of ordering. I just put up some lettering that I had ordered last night.

Oh the things I could spruce up with sticky vinyl!!!

Happy Crafting!


Wednesday, October 28, 2009

What does your door say about you?

As I drive around I often find myself looking at doors. I like to see them in all their jewelry and fine raiment. The way they are accessorized, or not accessorized, says a lot. You have clean and simple, traditional, relaxed, and everything in between. One thing is for sure... The door is a place where guests will always stop and take pause. While you are hurrying to answer that bell or knock, we guests are looking around and waiting. What would you like your door to say about you? Of course, it is just a door but Hey! We can always use something or someone saying good things about us! Why not our door, too?
Here is my door.

I L-O-V-E my door bucket! I got this from Southern Living at Home and I must say that it was one of the best buys ever. It wasn't super cheap but it has paid off big time in space savings and conserving pennies on seasonal wreaths. It is always on my door. I never store wreaths, not anymore. I used to have a storage room full of wreaths, but as we've gained children we've lost space. Not to mention that every year I lost a few wreaths to getting smushed and abused. Now I keep a single box of things to switch out seasonally and that's all the storage I need! I replace the picks but the greenery is usually the same. I put a sparkly skull (from the one dollar store) in there for Halloween this year. I used a dowel to hold him in. Skewers work well, too.

The numbers are a recent addition. (Notice the pesky bubble... grrrr!)


Check back tomorrow for a detailed description of how I did this less than $2 project.

I know... I could use a new door. I could actually use several, but for now this one will have to do. It needs to be stripped down and needs a new coat of paint. The beige paint has not held up well. Sadly, it has bubbled up and scuffed off in places but I've done what I can. I've broke out the paddles and gave this poor door a bit longer. Hopefully the old guy will retire soon - if I win a lottery, that is.
Until then, happy decorating!

Tuesday, October 27, 2009

Read all about it!


So, as I was reading 2 other blogs, I was thinking about how glamorous it would be to actually get my ramshackle house printed in a magazine. I thought about this for a few days before my sad mommy brain remember the fact that... YES! This little tract home has been printed in a magazine... this magazine...
No, it didn't pay and it was just a local magazine but it was pretty cool. How did I ever forget that! We were so excited to get chosen and it happened so unexpectedly. You see, a mom in a mommy group that I am in had asked if any of us had inexpensively converted a baby room to a toddler room. I didn't think much of it but answered her with pics and a little description. She sent my story to the magazine and I'm still not sure of the details. I guess she worked there or wrote for them sometimes. So, it's the next month or so and I get an e-mail saying that they are sending out a lady to get the story and a photographer! I was thrilled. I rushed to touch up paint and bought a new set of silver doorknobs for our son's closet and door. The morning of the big event was a morning of letting the kids sleep in. It was a morning of rushing to mop the floor so it would be nice for the shoot and not a morning of getting ready or even washing my face! After getting my story and shooting the room the photographer decides that he would like to take a pic of me and the kids in the front yard! YIKES! As you can imagine we didn't look very polished in this picture but we took the pic, nevertheless, and the rest is history.
(BTW, did you notice that the knobs didn't get in the picture?)
The room has changed since this write-up. My hubby decided our son had to have this a train table and the $50 price tag at a local consignment store was just too good to pass up. I'm not much on cluttered spaces so we nixed the toy box and his tool table. The drawers under his train table hold all toys that once made their home in his toy box. (Yes, it's a monster of a train table.) The tool table is currently sitting in the living room and irritating me every second of the day. :) Here are some new pics of his room. This is the view from the door.
His bookshelf sits opposite his bed. It holds extra toys, books, and items that were given to him at birth. I took the pic of half of the bookcase to give you some perspective of where the bookcase sits.
(Don't you hate it when you see pics of one wall of a room? I always wonder about those walls that I didn't get to see... what great decorating ideas and eye candy I missed... I'll cry on the inside for all those walls that I never got to see. *sigh*)
Here is the the monstrous train table. It sits on the wall opposite his window. I love it because he doesn't throw his trains all over the floor... as much.
I've been promising myself that I would blog every other day at the least. Hopefully I'll have my whole house up soon. The good, bad, and the ugly. LOL!
Happy Decorating!

Sunday, October 25, 2009

Always. On. A. Budget.

When I say budget, I don't mean the budget that I was on in days gone by. I mean the budget that a family with three kids and one income are on. The budget that a family has after that one income covers school costs and book costs of two of those children. I could further elaborate but I'll spare you the details. ;)

Anyway, with that in mind here are some of my finds and cheap items that I thought I would share...
This is a little painting I ran upon while looking for a lovely frame in a thrift store. At first my eye saw the frame but I was quickly taken by the painting itself. I loved the picture so much that I'm keeping it just as it is, I think. Commitment issues - that's me. Anyway, the picture doesn't look like what I had intended to go into our bedroom but I really like it there. Something about that ripe and delicious melon seems so sensual to me. It could be because I'm a huge foodie and even though I've never actually tried a cantaloupe, when I look at that painting I can practically feel it squish between my teeth as the juice oozes onto my lips. Nothing is sexier than that. And after all, isn't that what decor is about - making your space yours... to your likes and not someone else's. I paid a whopping $5 for this! (sarcasm intended here)


Here is the next item on my list. It's not much but the color and texture appealed to me. I love the shades of the sea, from dark blue to light greens. I'm so taken by any color of the sea. I think in my former life I could have happily been a pirate. This was a meager .49 at the thrift shop and it works perfect on my make-up table. I've been needing a pretty to hold my make-up brushes and I think this really fits the bill.

Okay, tonight I will leave you with one other thing. This cost me all of $3. After this I'm off to enjoy another peanut butter swirl brownie... MMMM!
This isn't the gorgeous galvanized cake stand that we've probably all seen floating around on the web but this is the best I could do without feeling too guilty about dropping anymore money on yet another pretty. I'm sure my hubby appreciates that, especially after my window shopping trip to the furniture store ended in a sales ticket for a new mattress and sofa. I also admit to buying an electric fireplace and chair, all this in the past three weeks. Oh, the guilt! But this $2 silver tone pedestal and $1 silver tone pizza pan -guilt free! I threw on some candles, pumpkins and a crow that I already had and I came up with, what I think is, a loverly $2 centerpiece for the table.


Happy Decorating!

Saturday, October 24, 2009

Goodbye White... With Regrets...

Ah, I have been waiting for this day. I loved my white set but with three kids running around it never stayed clean for long. Well, let me correct that. The set was actually "oyster" in color. Either way, it didn't work for our family. Although, I did enjoyed my cozy but clean color scheme. Now I'm sitting her on a black leather sofa, which I do love, but what a change! I adore coastal elements and we try and bring stuff back from the beach when we go. I'm sure those things will stay and I am forever in love with mid-century and classic design. As always, budget takes precedent. I need inspiration...

Clean black frames, a neutral color on the walls, touches of blacks and woods, and a beautiful turquoise table peeking out are all elements that appeal to me in this gorgeous entryway below.

http://www.roomzaar.com/rate-my-space/Living-Rooms/beach-chic-Entry-to-living-area/detail.esi?oid=519917


Ah, and a pic of my living room. Nothing was on the table or side table because we had cleaned it off to move the furniture but you get the idea of before...

Thursday, October 1, 2009

Contact

E-mail me at:
themanyfacesofmom@gmail.com

Links

Related Posts with Thumbnails